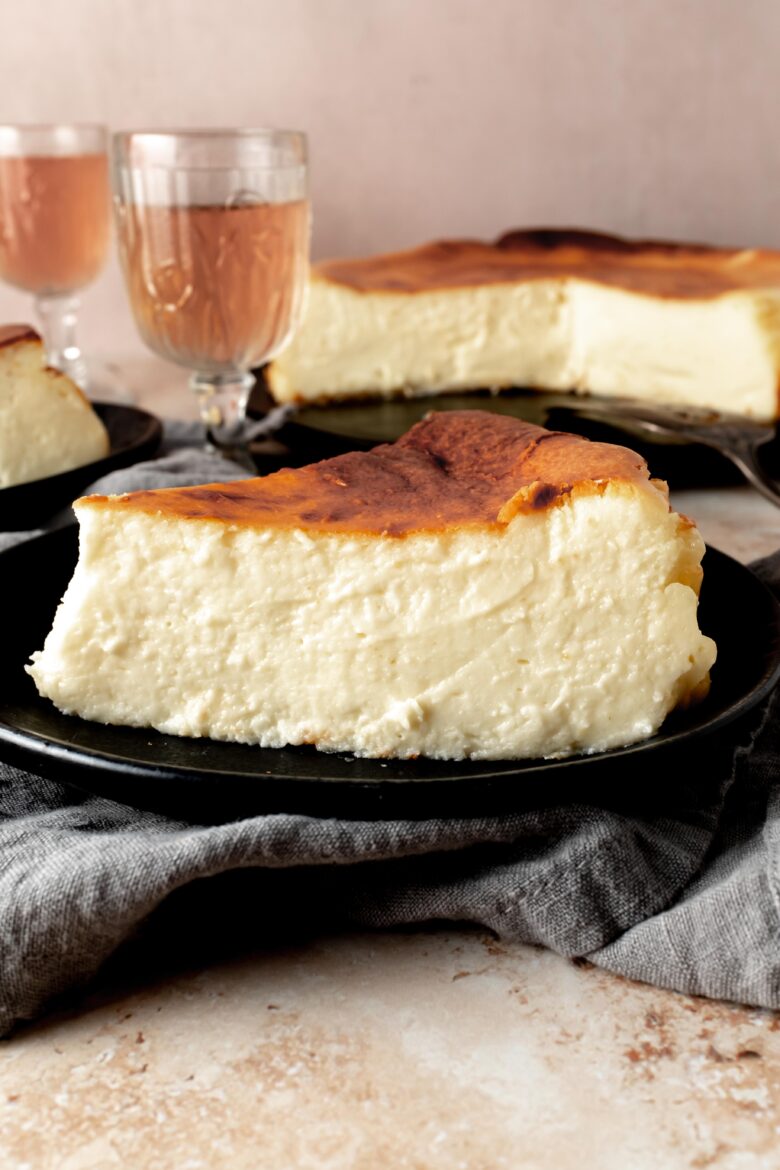
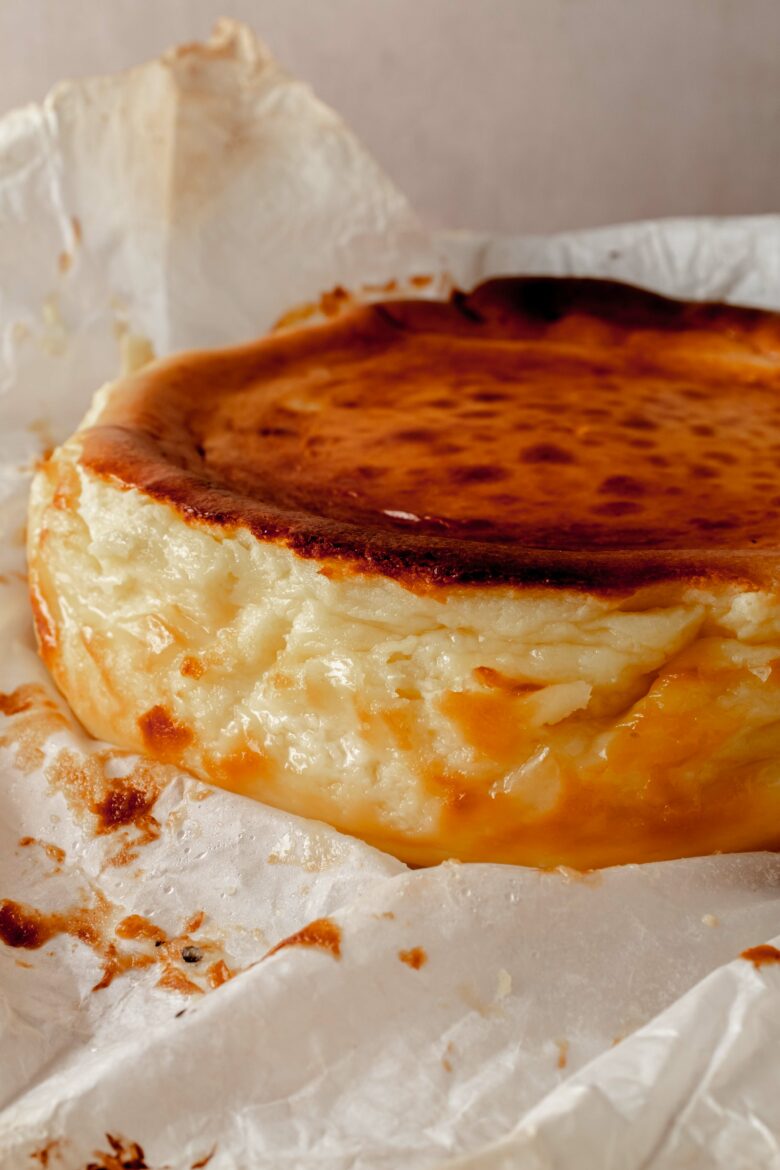
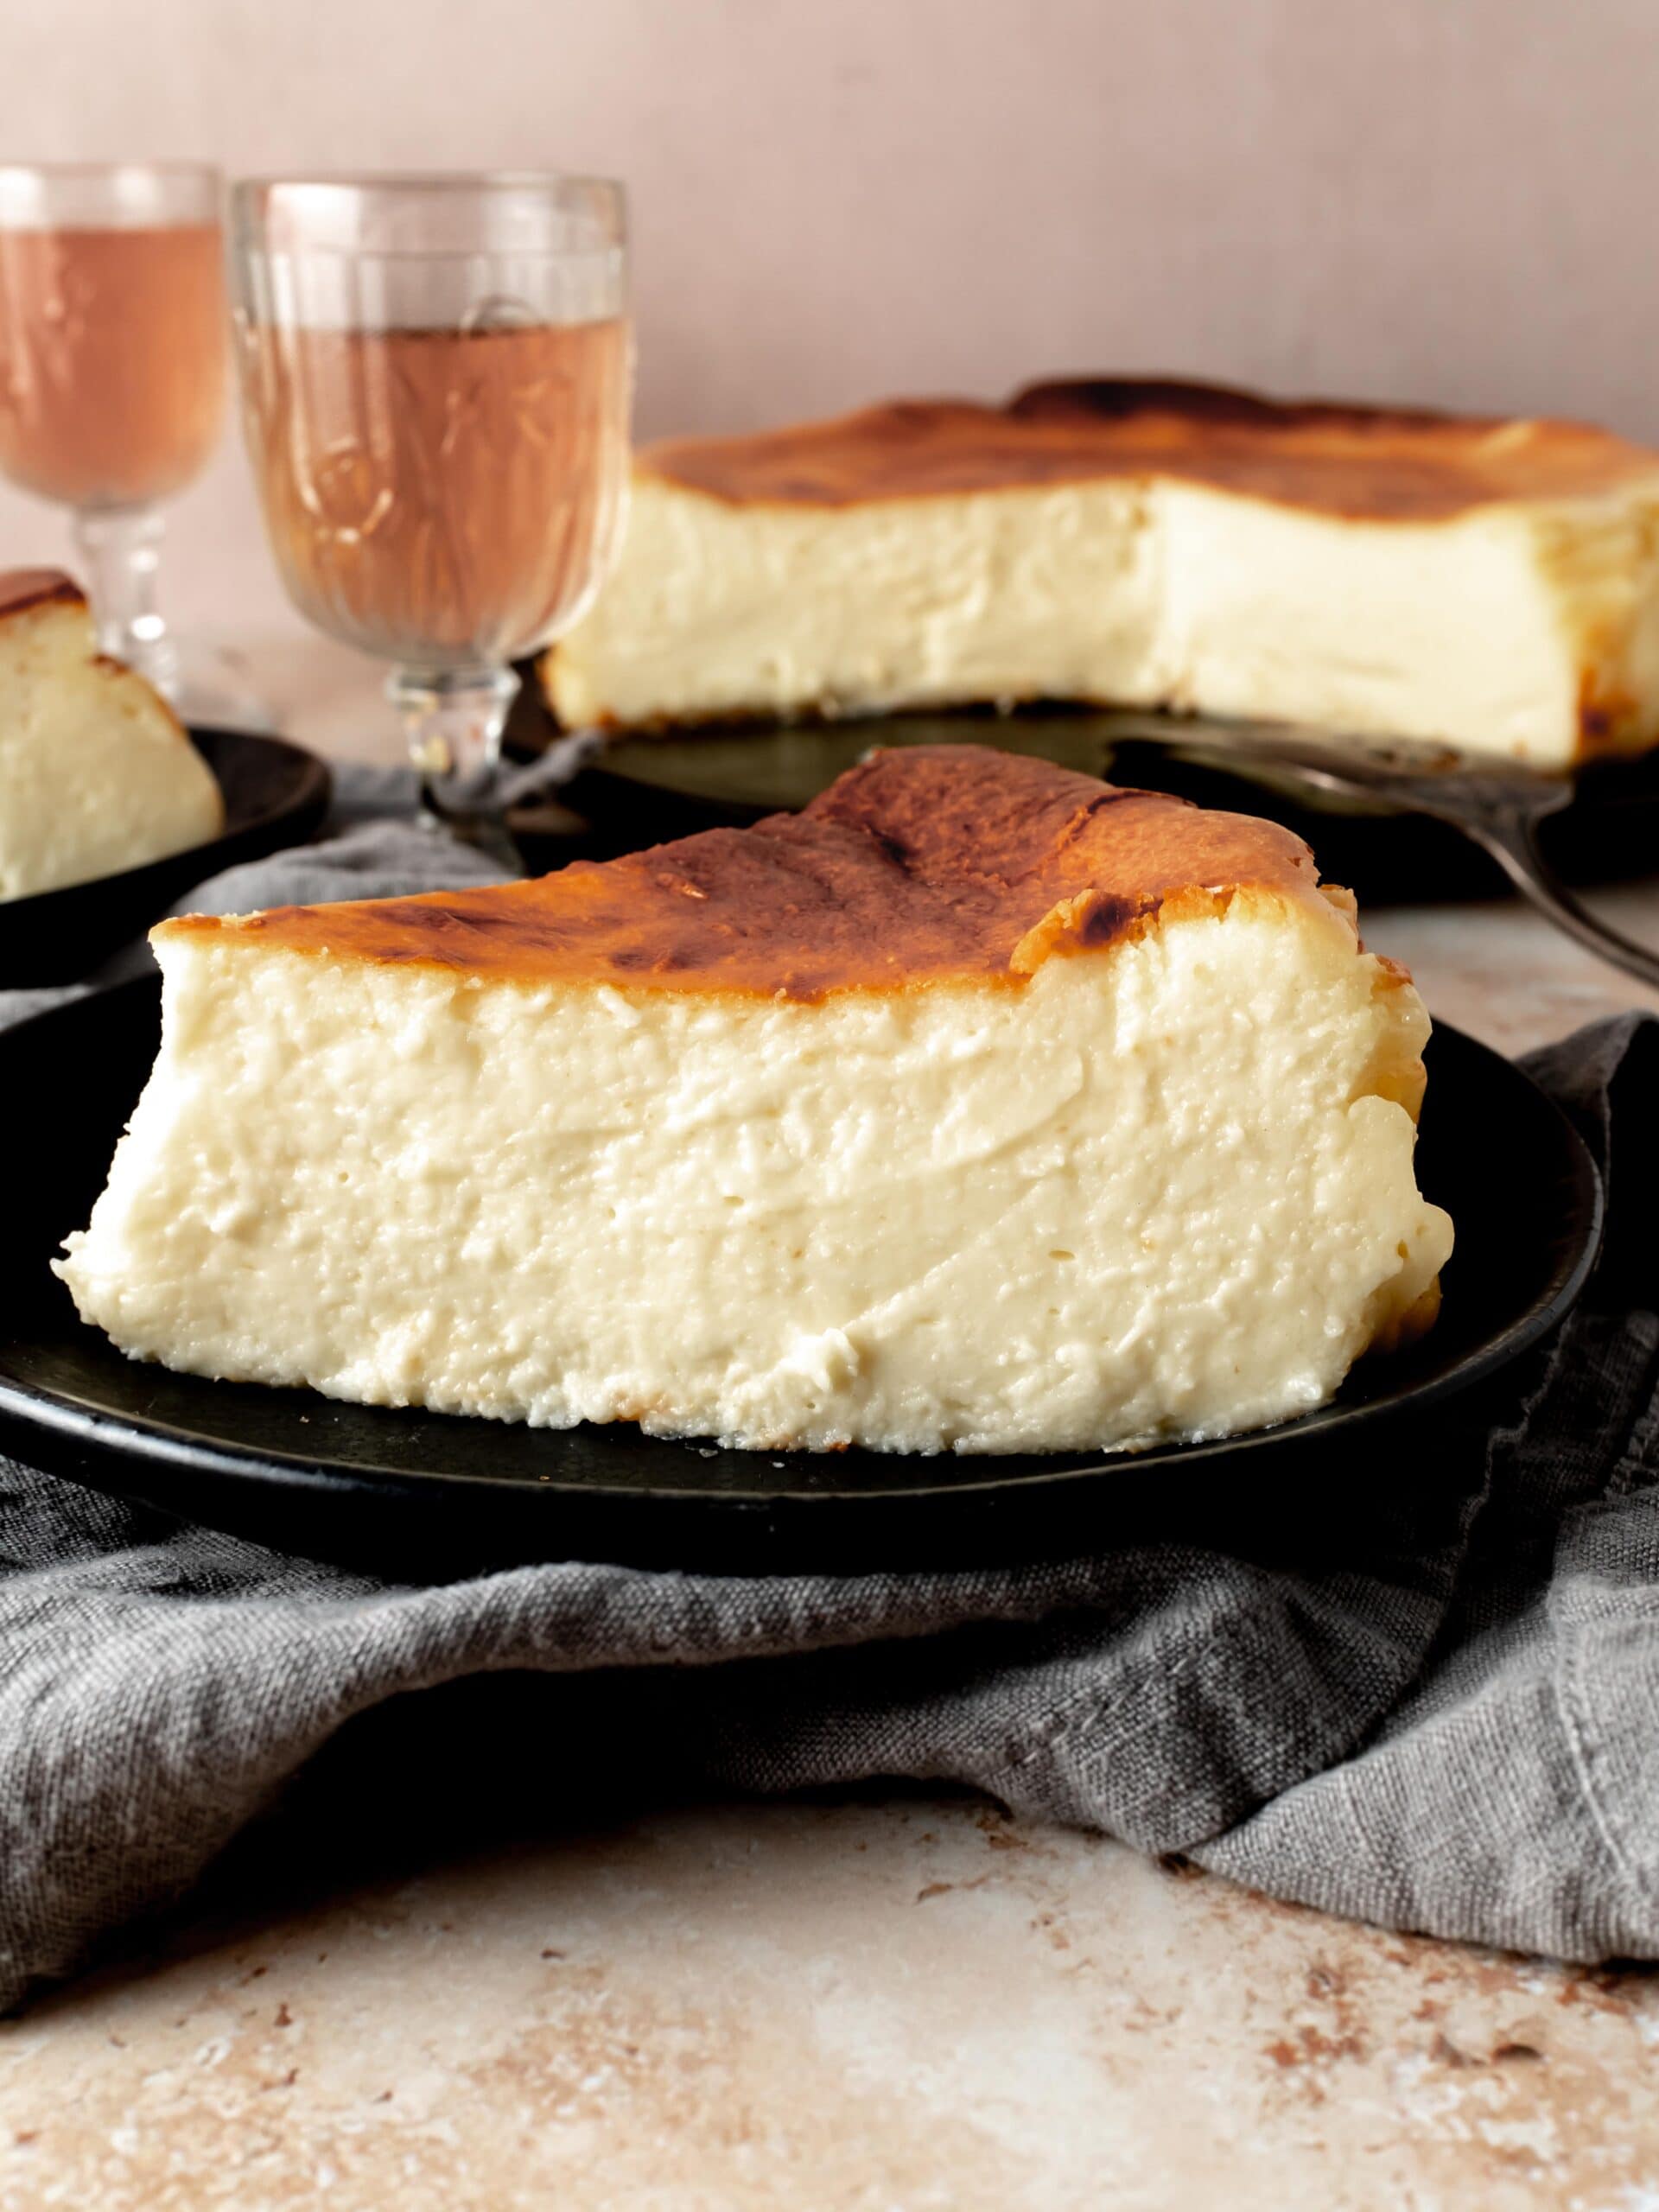
This no-crust, no-fuss San Sebastian Cheesecake features a caramelized top and creamy, custard-like interior. Burnt basque cheesecake can be prepped in 15 minutes with just six ingredients and one bowl!
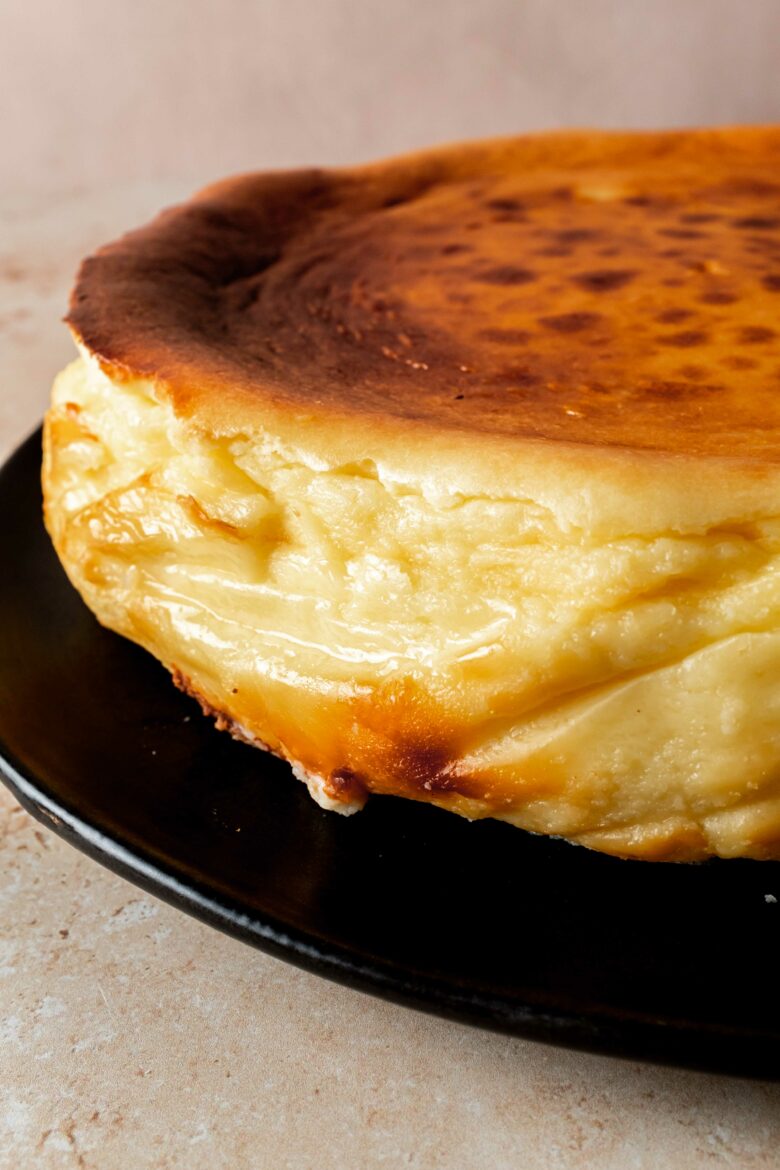
Forget all you know about making the perfect cheesecake! San Sebastian Cheesecake is baked at a high temperature for a deliciously caramelized top that contrasts perfectly with the smooth inside. The simple cake will puff up in the oven and then sink back down as it cools. And what about cracks? With that flavor and texture — who cares! This rustic beauty is perfect in its imperfections.
Recipe ingredients
This San Sebastian cheesecake recipe is simplicity at its finest and is made with just five ingredients! Other than adding a pinch of salt for balance, we’ve kept our version very close to the original cheesecake recipe from La Viña restaurant.
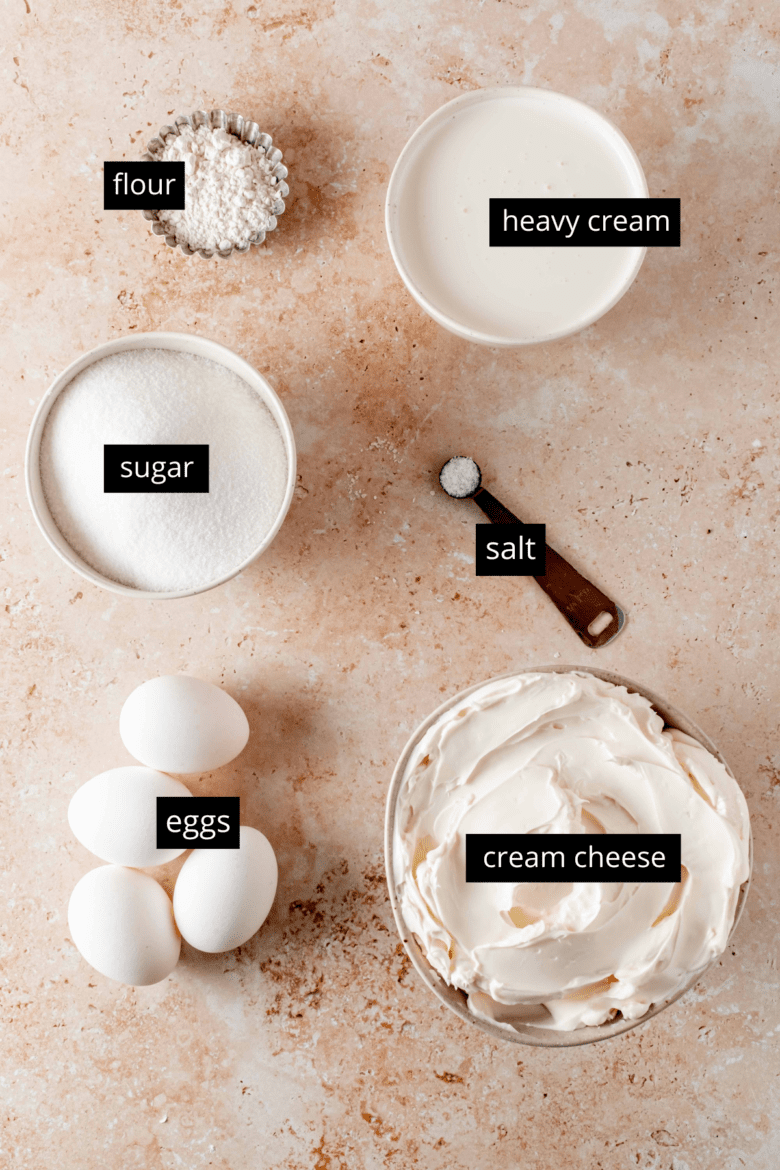
- Cream cheese
- Granulated sugar
- Eggs
- Heavy cream
- Kosher salt
- All purpose flour
Step by step instructions
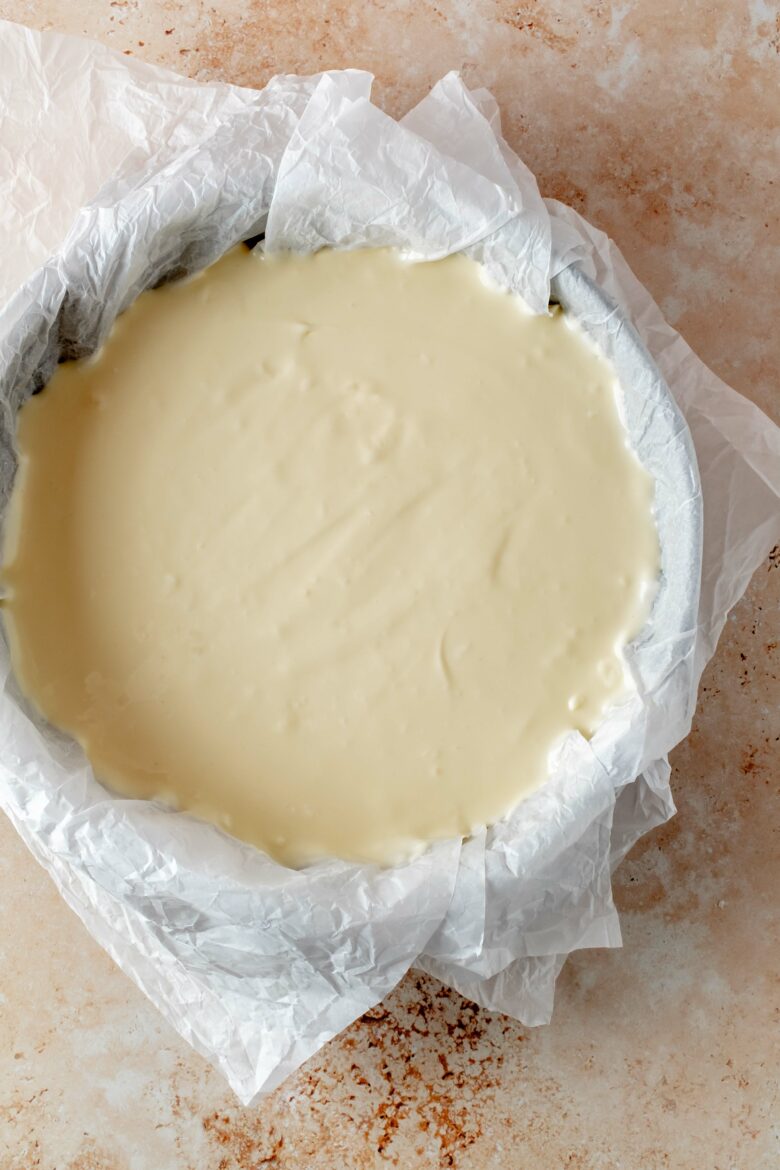
The San Sebastian cheesecake batter can be made in four easy steps:
- Beat together the cream cheese and sugar until the mixture is smooth and the sugar has dissolved.
- Add the eggs, beating after each addition.
- Pour in the heavy cream and salt. Mix until combined.
- Sift the flour into the batter (this will prevent any lumps) and mix until fully incorporated.
Then just pour into a springform pan lined with parchment paper and bake!
Storage and freezing instructions
San Sebastian cheesecake can be stored in an airtight container in the fridge for up to 5 days. Bring to room temperature before serving.
To freeze San Sebastian cheesecake, allow it to cool to room temperature and then place it in the fridge for several hours. Carefully peel away the parchment paper and then wrap tightly with plastic wrap. Wrap with a layer of aluminum foil and transfer to the freezer for up to 3 months.
To thaw, leave the cheesecake in the fridge overnight and let it come to room temperature before serving.
San Sebastian Cheesecake vs. American Style Cheesecake
Here’s how our San Sebastian cheesecake recipe differs from the cheesecakes we generally make in our kitchen:
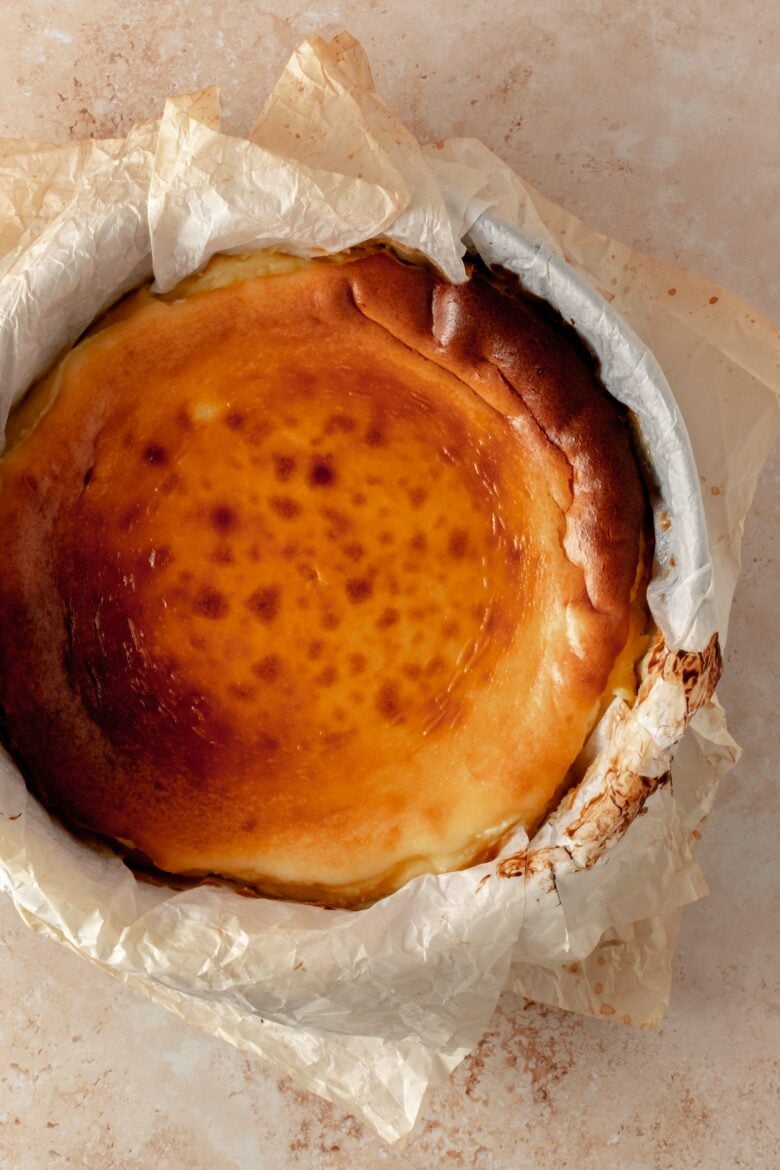
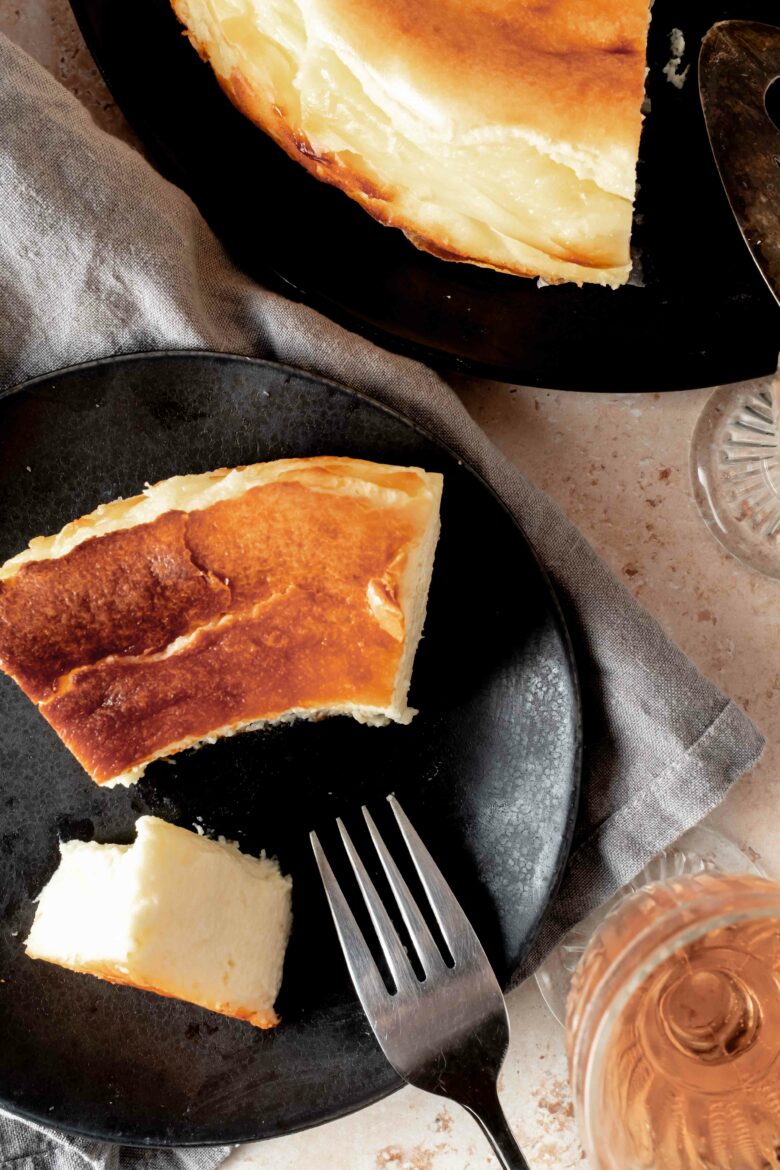
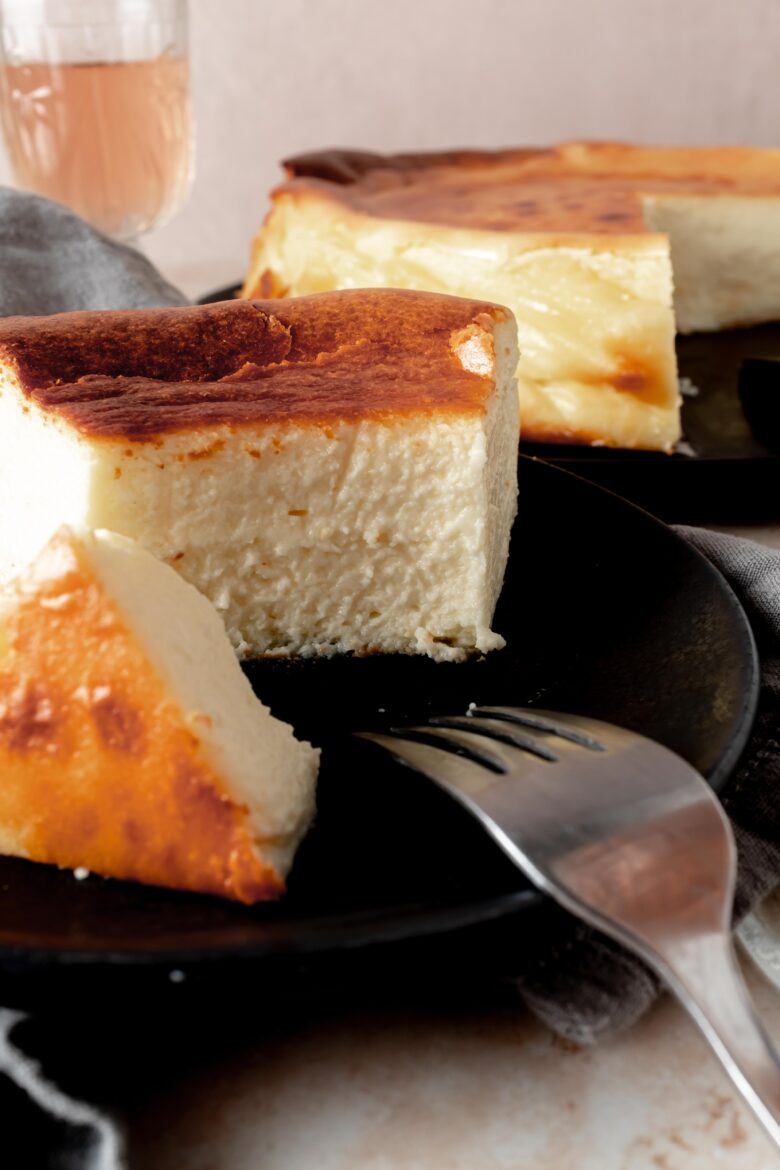
- Crust: San Sebastian cheesecake is technically crustless, although the outer edges of the batter caramelize to form a natural crust. Additionally, the springform pan is lined with parchment paper, which gives the cake a rustic feel as opposed to the smooth edges of traditional cheesecakes.
- Flavor: The cheesecake is still rich and creamy, but has a more custard-like flavor.
- Texture: This cheesecake is less dense than a traditional american cheesecake. It has a smooth, light and airy texture.
- Baking temperature: American style cheesecake is traditionally baked at a lower temperature. San Sebastian cheesecake is baked at a high temperature for a beautifully caramelized top.
Expert tips and tricks
Before you get started with your San Sebastian cheesecake, here are a few expert tips and tricks:
- While it’s often called burnt basque cake, the top of the cheesecake shouldn’t actually be burnt but rather caramelized.
- Baking times can vary significantly from oven to oven. Your cheesecake may require anywhere from 50-70 minutes of baking time. The finished cheesecake will wobble quite a bit. If you’re unsure whether the cake is cooked through you can check the internal temperature which should be 155°F (68°C) in the middle.
- Make sure your springform pan is at least 3 inches (7.5 cm) tall. The cake will rise in the oven and then sink back down as it sets.
- To easily line your pan with parchment paper, first sprinkle water over the parchment paper and crinkle it into a ball. Uncrinkle and allow to dry before lining the pan. This will make the parchment paper more pliable and easier to work with.
San Sebastian Cheesecake: FAQs
San Sebastian (or Donostia in the Basque language) is a coastal city nestled in the northern corner of Spain in Basque Country. This cheesecake was developed by a restaurant in the region: La Viña restaurant! The cheesecake’s popularity has exploded in recent years and you can now find it in bakeries and cafes worldwide.
A 9-inch (23 cm) springform pan works best for this recipe. You could also use a similar sized cake pan — just be careful lifting the cheesecake out of the pan. It might be a two person job!
A good glass of sherry is the perfect complement to this rich and decadent cheesecake!
Leftover San Sebastian cheesecake can be covered in plastic wrap and stored in the fridge for up to 5 days.
This cheesecake can be frozen for up to 3 months. To freeze, wrap the cheesecake or cheesecake slices in a layer of plastic wrap and then a layer of foil. Please note, while the cheesecake will still taste delicious after freezing, it will lose some of its light and airy texture.
Loving this San Sebastian cheesecake? Check out these recipes for more cheesecake inspiration:
San Sebastian Cheesecake Recipe
- Total Time: 5 hours 10 minutes
- Yield: 10
- Prep Time: 15 minutes
- Cooling Time: 4 hours
- Cook Time: 55 minutes
- Category: Dessert
- Method: Baking
- Cuisine: Basque
Ingredients
- 32 ounces (900 grams) full-fat cream cheese, softened to room temperature
- 1.5 cups (300 grams) granulated sugar
- 4 large eggs
- 1 ⅔ cups (400 ml) heavy cream
- ¼ teaspoon kosher salt
- 2 tablespoons (15 grams) all purpose flour
Instructions
- Preheat oven to 400°F (200°C).
- Line a 9-inch (23 cm) springform pan with parchment paper, leaving several inches (5 cm) overhang at the top.*
- Use an electric mixer to beat the room temperature cream cheese and sugar on medium speed until smooth. Scrape down the sides of the bowl as needed.
- Add the eggs one at a time, beating after each addition.
- Pour in the heavy cream and salt. Reduce mixer speed to low and continue beating until combined.
- Sift the flour into the batter and mix until fully incorporated.
- Pour the batter into the prepared pan. Place the pan on a rimmed baking sheet and bake for 55-65 minutes.* The edges will be set, but the center should still jiggle.
- Let the cheesecake sit for 4 hours at room temperature, then unmold and enjoy or cover and store in the fridge until ready to serve.
Notes
Parchment Paper: To make the parchment paper more pliable and easier to work with, you can sprinkle a bit of water on it and then crinkle it into a ball. Uncrinkle and let dry before lining the pan. Pleat the parchment paper where needed to fit the pan. Use two overlapping pieces of parchment paper if one isn’t large enough.
Cheesecake Temperature: If you’re not sure if your cheesecake is done cooking, you can check the internal temperature with an instant read thermometer. The middle of the cheesecake should be at about 155°F (68°C).
Storing: This cheesecake can be wrapped in plastic or transfered to an airtight container and stored in the fridge for up to 5 days. Bring to room temperature before serving.
Nutrition
- Serving Size: 1 slice
- Calories: 600.41
- Sugar: 34.56g
- Sodium: 380.18mg
- Fat: 47.23g
- Saturated Fat: 27.96g
- Unsaturated Fat: 14.70g
- Trans Fat: 1.55g
- Carbohydrates: 37.34g
- Fiber: 0.04g
- Protein: 9.33g
- Cholesterol: 210.14mg
This post may contain affiliate links through which we may earn a small commission at no additional cost to you. We only recommend products that we genuinely love and would use ourselves.
4 comments
Can I use heavy whipping cream or should it be regular heavy cream? Thanks.
Heavy whipping cream will work great! 🙂
This was delicious. I would give it 10 stars. I can’t see another recipe being better than this. Very basic ingredients. You don’t need more eggs, more sugar, more flour or more heavy cream. It’s just perfect the way it is. And the longer it sits, the better it gets. My crust didn’t brown as much as the picture. I used heavy cream instead of heavy whipping cream. Maybe that’s why? Next time, I’ll use heavy whipping cream.