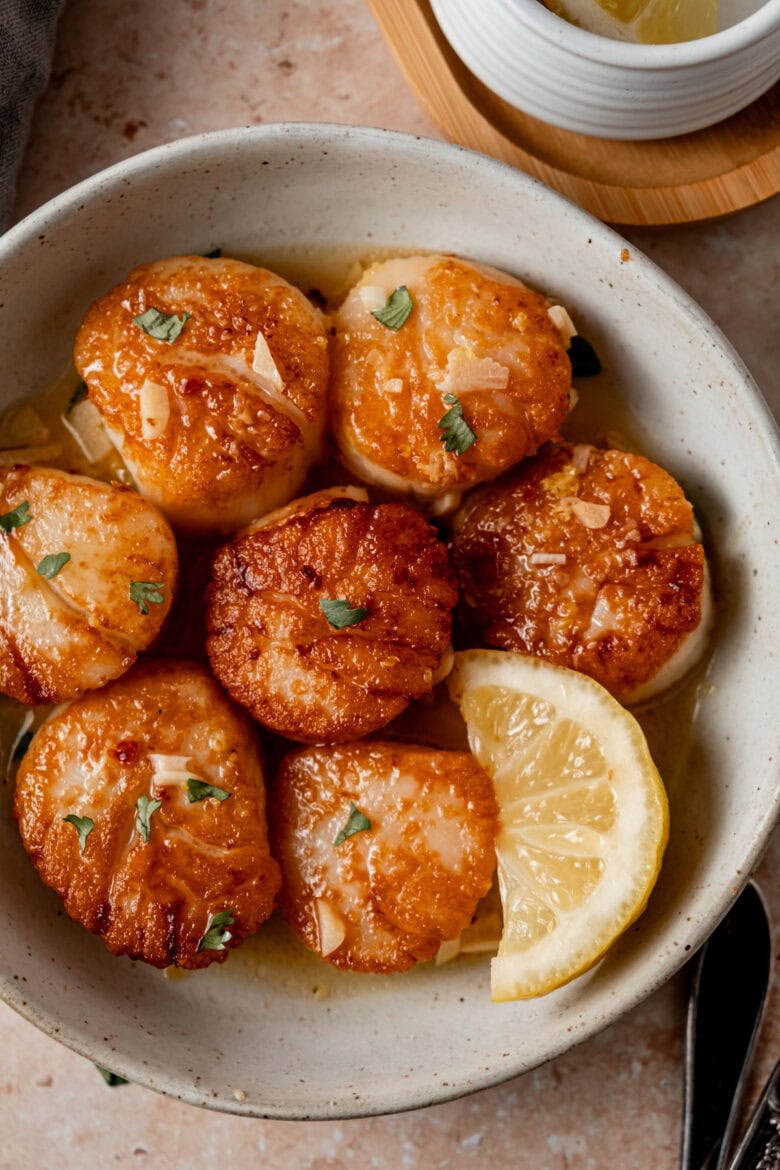
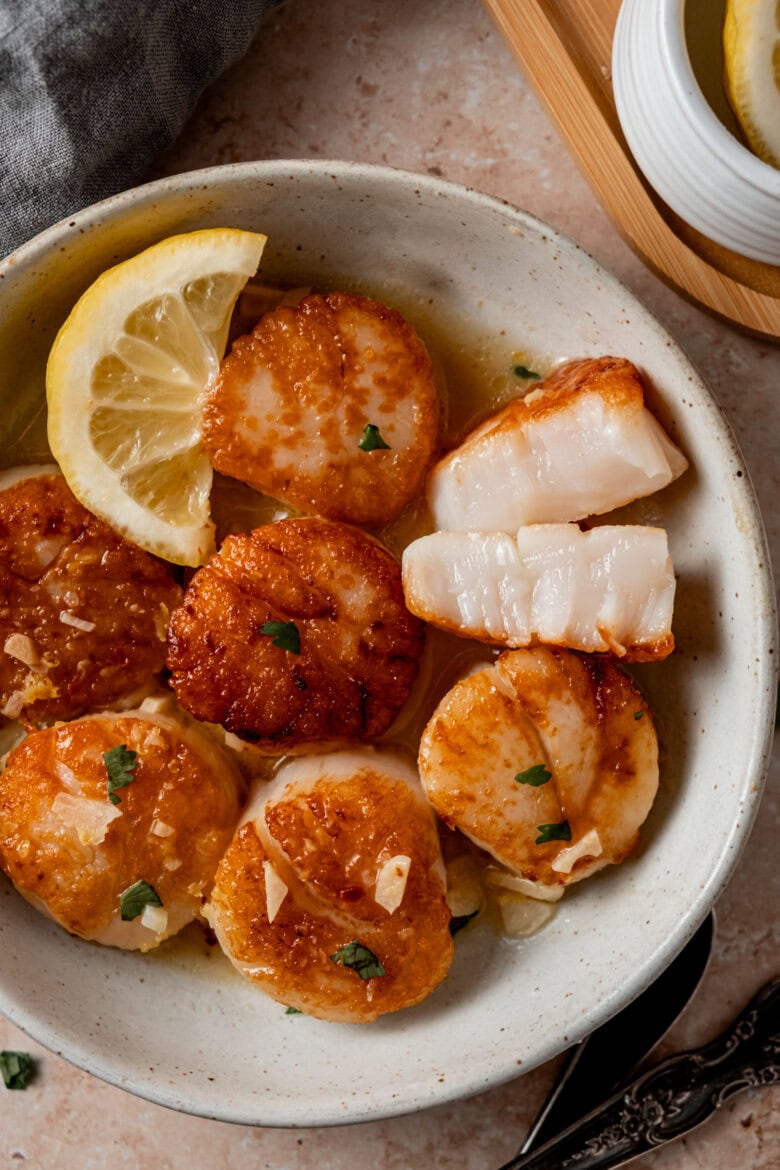
These Cast Iron Seared Scallops are cooked in minutes and make for an effortless date night dinner that is sure to impress!
Searing scallops in your cast iron skillet might seem a little daunting, but really success all comes down knowing how to buy and prep the them. This guide will teach you everything you need to know to get perfectly caramelized scallops on your first try!
Looking for more Cast Iron Skillet Recipes perfect for date night? Check out our Reverse Sear Filet Mignon and Cast Iron Pizza.
Seared scallop ingredients
Equipment: You’ll need a large cast iron skillet for this seared scallops recipe. Cast iron skillets heat evenly and retain heat well, making them perfect for getting a good sear on your scallops without overcooking them.
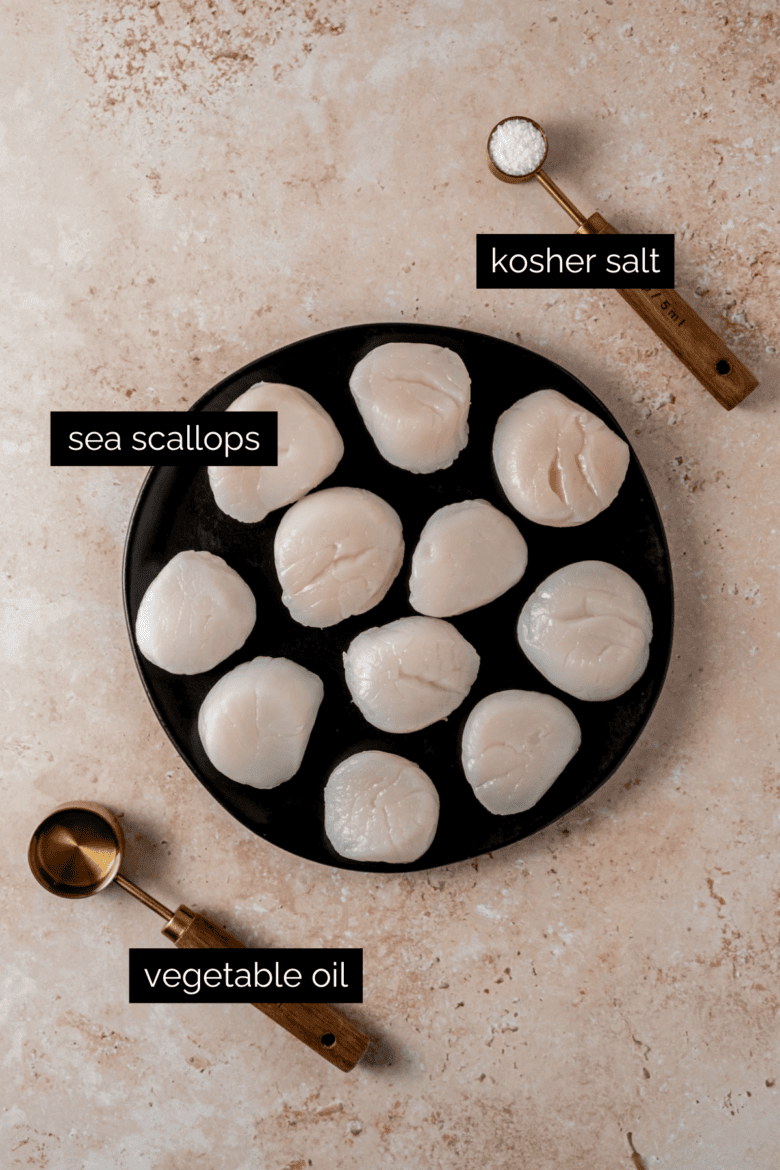
- Sea scallops: Look for large sea scallops, fresh or frozen, for these cast iron seared scallops.
- Kosher salt: Salt is the only seasoning you’ll need for perfectly seared scallops.
- Vegetable oil: You need to use an oil with a high smoke point for these cast iron scallops. I prefer vegetable oil, canola oil or sunflower oil.
The most important tip when buying scallops: Frozen or previously frozen scallops are often treated with a solution called STPP (sodium tripolyphosphate). This solution preserves the scallops, but also plumps them up with excess liquid. The extra liquid makes it almost impossible to get a beautiful sear.
When shopping for scallops opt for “dry” scallops, which means they haven’t been soaked in the solution. I buy STPP-free frozen scallops at Whole Foods.
Step by step instructions
Step 1: Thaw the scallops (if frozen). You can thaw the scallops in the refrigerator overnight. To quickly thaw scallops, transfer the scallops to a sealed bag and place them in a bowl of cool water. Change the water several times until the scallops are thawed.
Tip for using frozen scallops: Frozen scallops will release a lot of water when defrosting. I generally let the scallops thaw in the fridge overnight. The next morning I drain the scallops of water and place them on a paper towel lined plate until I’m ready to use. Make sure to leave leave space between the scallops to help more water evaporate off the surface. You may want to change the paper towels several times and drain any liquid that pools on the plate.
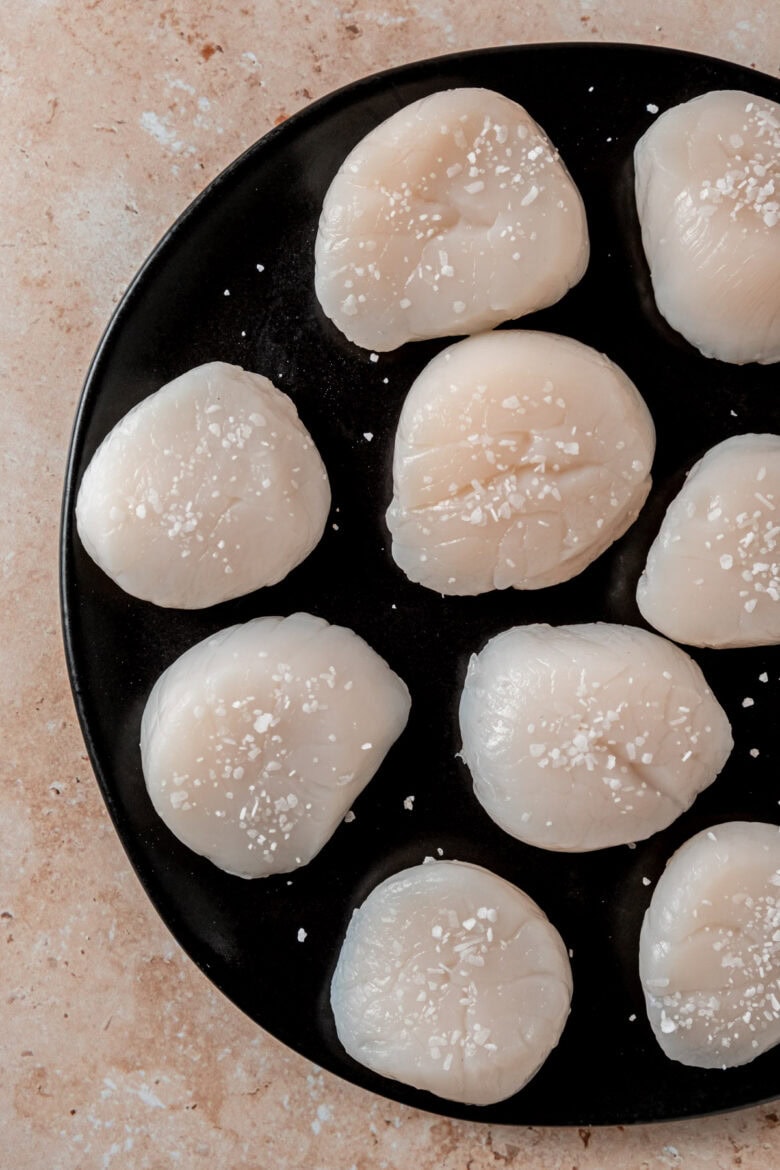
Step 2: Prepare the scallops. Some scallops are sold with the side muscle still attached. While it’s perfectly safe to eat, it becomes tough and unpleasant when cooked, so it’s best to remove it. To remove the side muscle, simple peel off the rectangular shaped tab on the side of the scallop.
Step 3: Pat the scallops dry. This is the most important step! Use paper towels to pat the scallops dry. You may go through quite a few paper towels, but it’s important that the surface is completely dry. Wet scallops won’t develop a good crust.
Step 4: Heat the oil in a cast iron skillet. You’ll need 1-2 tablespoons of oil with a high smoke point, such as vegetable, canola, grapeseed or sunflower. Use enough oil to thinly coat the bottom of the skillet.
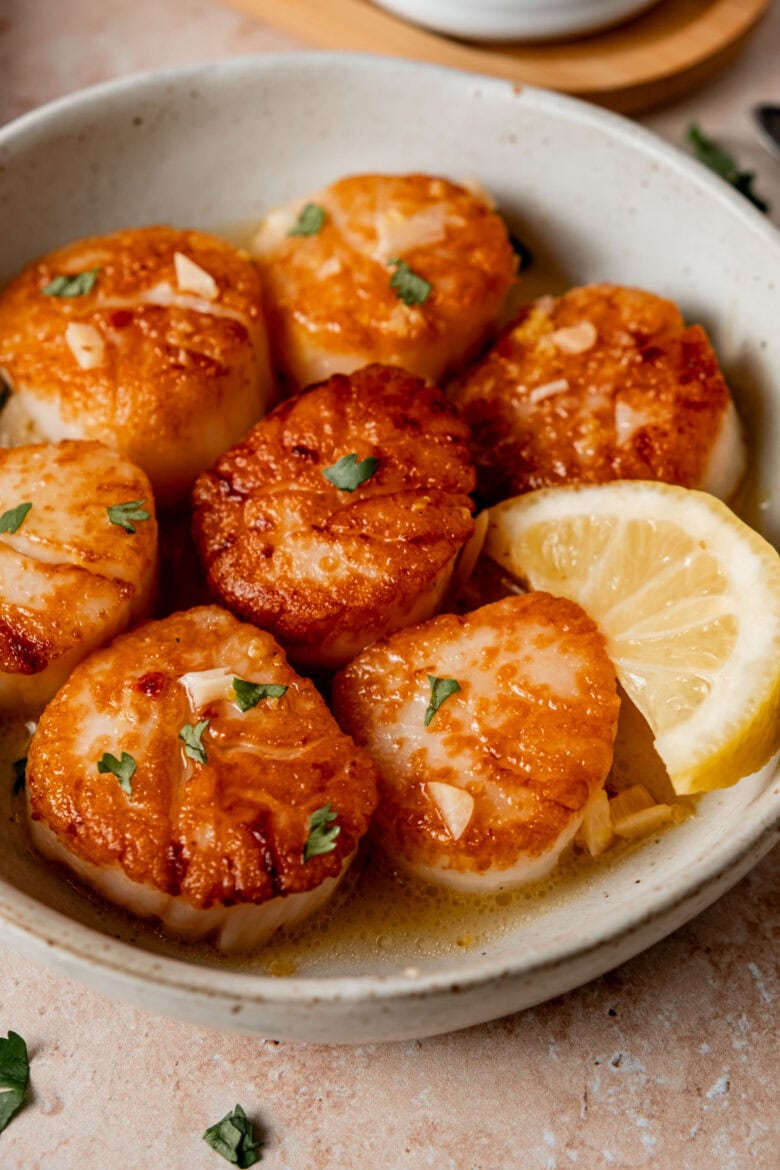
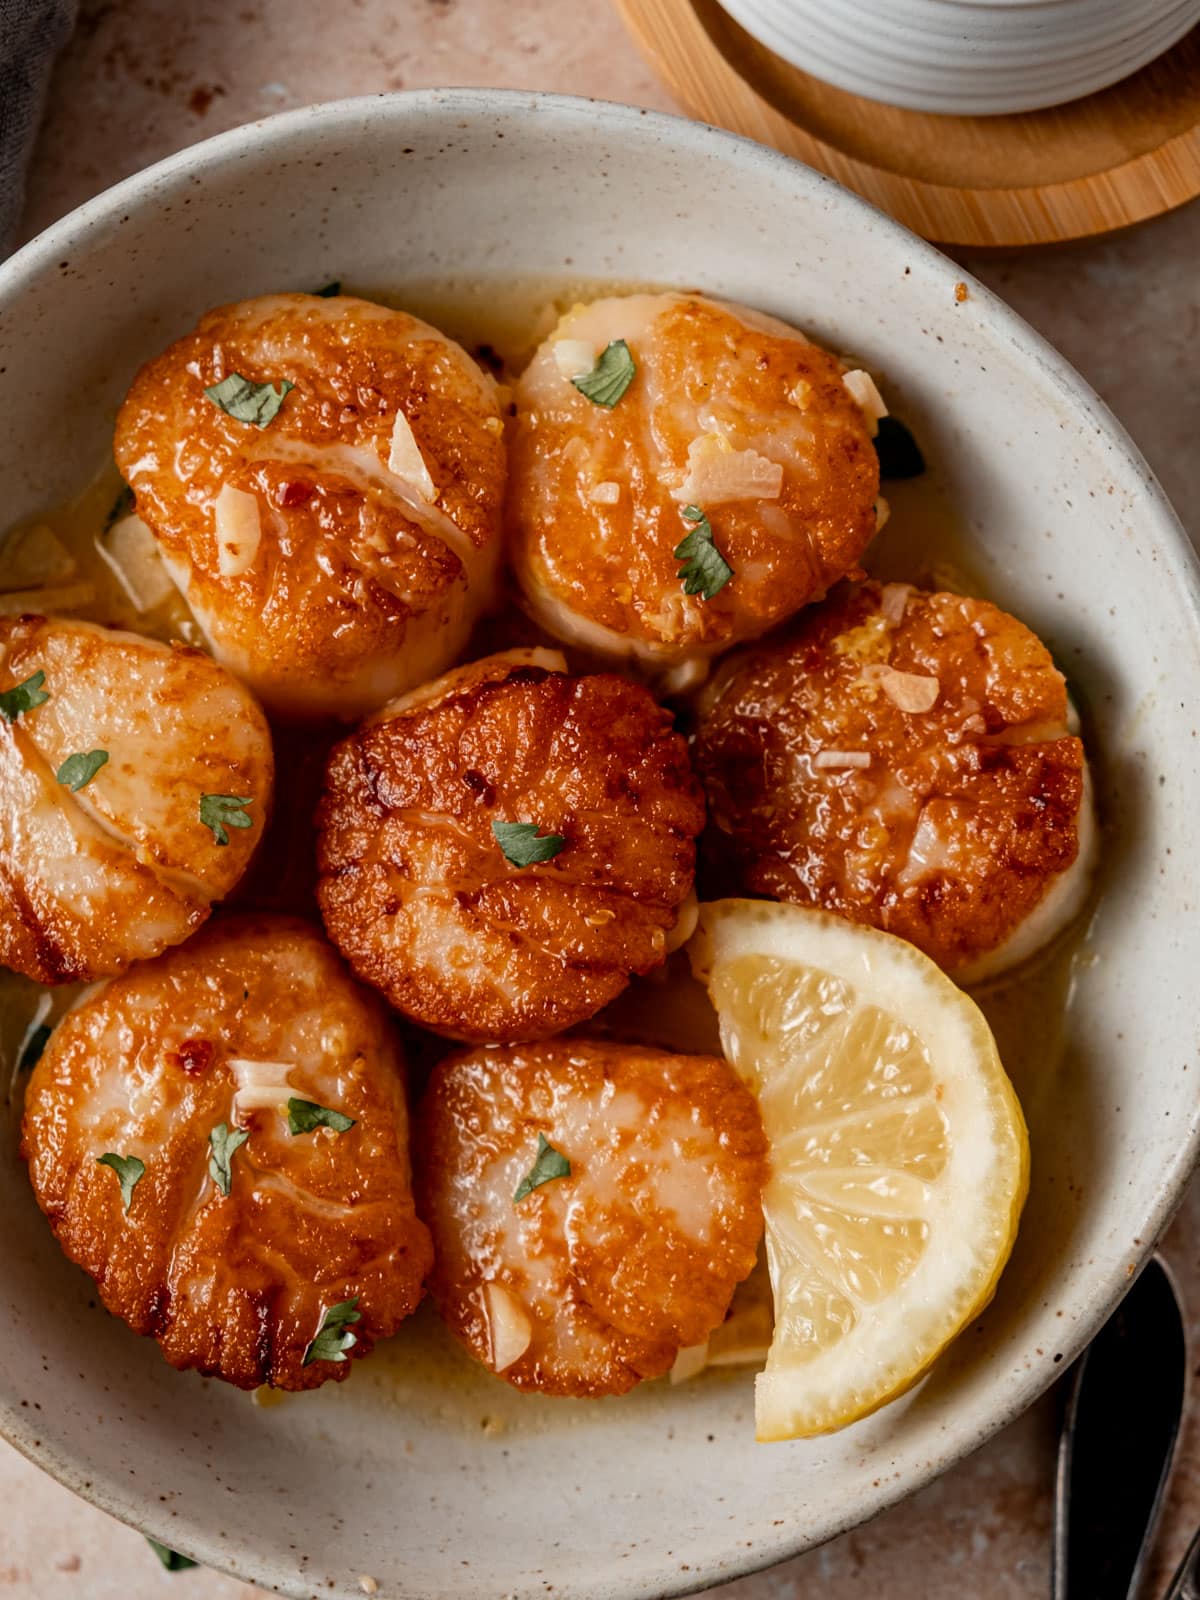
Step 5: Sear the scallops for 1-2 minutes on each side. If your pan is hot enough, one minute is generally enough to get a good sear. Your scallops are ready to flip when they easily release from the pan. If they haven’t formed a good crust, they’ll stick to the pan — give them 30 seconds more and then try again.
Storage
Leftover seared scallops can be stored in an airtight container in the refrigerator for up to two days.
To reheat scallops, I like to briefly saute them in butter over medium-low heat until just warm. This adds a bit of moisture to the scallops and cooks them gently so they don’t become rubbery.
What to serve with seared scallops
- White wine cream sauce: A big plate of linguine with our indulgent White Wine Cream Sauce makes for a perfect date night dinner.
- Lemon garlic butter: Saute minced garlic and lemon zest in butter, add a bit of lemon juice and then spoon over the scallops for a flavorful finish.
- Avocado lime crema: For a light summer dinner, these cast iron seared scallops are delicious served over our bright avocado lime crema.
Expert tips and tricks
- Buy dry or STPP-free scallops. Wet scallops are soaked in an STPP solution that adds excess moisture and makes the scallops near impossible to brown. Opt for dry or STPP-free scallops for these cast iron seared scallops.
- Make sure the scallops are completely dry before searing. The surface of the scallops should be almost tacky, but not at all wet. Use as many paper towels as you need to soak up excess liquid. It’s also helpful to place the scallops on a paper towel lined plate (with space between them) and place them in the fridge for several hours before cooking. This helps moisture on the surface of the scallops to evaporate.
- Avoid overcrowding the cast iron skillet. Make sure the scallops have ample room between them so they don’t steam, which can prevent a good sear and cause overcooking.
- Don’t touch the scallops until they easily release from the pan. When scallops stick to the pan it means the crust hasn’t formed. Give them another 20-30 seconds before trying again.
FAQs
You need to use dry scallops, which are scallops that have not been treated with STPP. Wet scallops are plumped up with the STPP solution, which results in too much excess liquid. This makes getting a golden brown crust difficult. We also find that wet scallops have a more rubbery texture, even when cooked to the perfect temperature.
I recommend sea scallops for this cast irons scallops recipe. Bay scallops are much smaller than sea scallops and don’t have a ton of surface area for searing. We prefer bay scallops for pasta dishes or seafood stews.
I regularly buy dry scallops at Whole Foods. The 365 brand of wild-caught sea scallops state they are STPP-free on the label.
Scallops will stick to the pan when the crust hasn’t fully formed. If your scallops are sticking, give them another 30 seconds. Wait until they easily release from the pan to flip. If you’re worried about overcooking the scallops, cook them for just 30 seconds on the second side. It’s better to get that beautiful crust on just one side and be perfectly cooked than to overcook the scallops.
Don’t wait until the scallops look done to pull them from the heat or you’ll have overcooked and rubbery scallops. Pull the scallops off the skillet when the internal temperature reaches 115°F (46°C). Carryover heat will bring them to a perfect 125°F (52°C).
More date night recipes
Loving these cast iron seared scallops? For more seafood recipes perfect for date night, make sure to check out these posts:
Print

Cast Iron Seared Scallops Recipe
- Total Time: 20 minutes
- Yield: 4
- Prep Time: 10 minutes
- Cook Time: 10 minutes
- Category: Dinner
- Method: Cast Iron Skillet
- Cuisine: Global
Ingredients
- 1 pound (450 grams) sea scallops (see notes*)
- kosher salt to taste
- 1–2 tablespoons vegetable oil, such as canola, grapeseed or sunflower
Instructions
- Pat the scallops dry and remove the side muscle if still attached. Season the scallops generously with salt on all sides. Place them on a plate lined with paper towels and let them sit for 10 minute.
- Add the vegetable oil to a large cast iron skillet. Use enough to lightly coat the bottom of the pan. Heat the skillet over high heat until the oil is almost smoking.
- Pat the scallops dry again — the surface of the scallops should be very dry! Working in batches, place the scallops in the pan. Give them some space – they shouldn’t be touching each other. Let the scallops cook for 1-2 minute or until they easily release from the pan.
- Flip the scallops and continue cooking 1 minute or until the other side is well browned. Make sure not to overcook your scallops. Prioritize getting the first side of the scallops well-browned and perfectly cooked, even if that means the second side of the scallops only gets a brief sear. The scallops should read 115°F (46°C) with an instant read thermometer. Carryover heat will bring them to the perfect final temperature of 125°F (52°C).
- Transfer the scallops to a paper towel lined plate to soak up any excess oil.
Notes
Buying scallops: You need dry scallops for this recipe, which are scallops that haven’t been treated with STPP (a solution that plumps up the scallops with excess liquid). I’ve had luck finding frozen STPP-free scallops at Whole Foods.
Using frozen scallops: If using frozen scallops, defrost them in the fridge overnight. Once thawed, drain and place the scallops on a paper towel lined plate and leave uncovered in the fridge for at least an hour. Make sure to leave space between the scallops to help surface moisture evaporate.
Storage: Leftover seared scallops can be stored in the refrigerator for up to 2 days.
Avocado crema: An earlier version of this recipe paired these scallops with an avocado crema. You can find the recipe here.
This post may contain affiliate links through which we may earn a small commission at no additional cost to you. We only recommend products that we genuinely love and would use ourselves.
2 comments
My family loves scallops so I’m always looking for new simple delicious recipes and this one did not disappoint! It really was so easy to make and full of amazing fresh flavour. Thanks for this, its a keeper!
Hi Sabrina! I’m so glad this one was a keeper for you – thanks for giving it a try! 🙂